Ubuntu KVM QEMU GPU passthrough to Windows VM
It's always been annoying to rely on dual-boot Ubuntu / Windows requiring me to switch between OS's on my home computer, but it seems in the past that's been the only solution to getting any apps to run correctly with proper performance. I saw in the past all these VMWare Fusion like things or WSL Linux subsystems, but I never bothered cause I don't really want to trust Windows as the primary OS and it's gross.
I kept seeing these articles about proxmox / KVM style solutions and how you can run Windows apps with full performance and it sounded like a dream. I didn't really want to invest in learning how proxmox works because that's a whole headache in and of itself, so Ubuntu QEMU with KVM seemed like the best option.
There are a TON of guides on how to get this to work correctly. This one: https://askubuntu.com/questions/1406888/ubuntu-22-04-gpu-passthrough-qemu is probably the most popular / the one that was most useful to me personally. I had to do a ton of googling and research and random reddit threads to understand what was going on.
The biggest issue to begin with is the difference between Nouveau (nvidia open source drivers,) and nvidia-drm / nvidia proprietary drivers. I didn't want to use Nouveau because it's incompatible with nvidia-container-runtime (used for binding GPUs to docker,) and also because it doesn't really work with CUDA or Ollama / LLMs.
My plan was to run this on my workstation EPYC server, which has 2 NVIDIA GPUs and no on-board graphics (which is another headache since I need the host display to run on some nvidia driver.) None of this is really covered in the guides since they're expecting you can rely on integrated graphics, which in my situation, I can't. After realizing that, I almost just gave up and tried to use Lutris to install wine / proton GE to run Windows apps, but even that is so broken that despite tons of tweaks I couldn't get it to work. (It may work for others or on different apps, but it definitely did not for me despite a lot of trial and error.)
So following the guide, I first tried to update grub (and later found out neither of these options is necessary since my IOMMU is already on by default with EPYC):
amd_iommu=on kvm.ignore_msrs=1The IOMMU flag is required if you're using a regular desktop motherboard / CPU, and the kvm.ignore_msrs I'm not sure it's even required in either case, but it wasn't in my case.
sudo apt install -y qemu-kvm libvirt-clients libvirt-daemon-system bridge-utils virt-manager ovmf virt-manager
These were actually the only packages I ended up requiring, and the only thing really required at all to get this working. I went through a LOT of weird configuration tests while trying to understand how exactly the NVIDIA drivers work, for instance there's some recommendations here to do something like this to the GRUB bootloader:
GRUB_CMDLINE_LINUX_DEFAULT="quiet splash amd_iommu=on kvm.ignore_msrs=1 vfio-pci.ids=10de:2204,10de:1c03"
After using
lspci -nnkto get the PCI-E ids – the thing is, that command only really works for Nouveau. The problem with nvidia-drm / proprietary drivers, is that on system boot it immediately locks the PCI-E ids, and VFIO (which is installed by QEMU / libvirt) needs to bind the PCI-E device first if you want to use them in a VM. But you can't determine the exact boot order since nvidia-drm is likely to grab it first.
All the guides discussion on how to 'blacklist' nouveau from modprobe kernel module loading to let vfio bind the PCI device, really only work if you have integrated graphics, if you have multiple GPUs instead that are all nvidia, you can't even do that because you still need the kernel mod.
So it took me a while to even get to this stage of understanding, because at first I assumed that you could just run QEMU and give it the PCI-E device ID you want to use, and it would automatically switch from NVIDIA to the VM. Unfortunately it does not work like that. Once a PCI-E is bound to nvidia-drm, NVIDIA will never let it go no matter what you do, even if NOTHING is using it, it will stall all other processes attempt to access it forever, it has a complete death grip over it.
I read a bunch of advice about dynamic unbinding scripts and how 'unreliable and difficult' they were, and I thought okay, I'm gonna be smart and try to prevent nvidia binding one device at boot time, and I'll introduce a kernel module loader dependency from nvidia-drm to vfio, that way VFIO runs first, grabs the 1st GPU, then nvidia-drm runs second and grabs the second GPU. All I needed to do was set some config options (shown in other guides,)
$ sudo nano /etc/modprobe.d/vfio.confModify this and the nvidia-drm conf and the grub bootloader, and we're off!
So anyways that bricked my computer. I still don't know how. I booted off a live cd and found out the /boot partition had been COMPLETELY erased. I'm honestly surprised that was even possible. I did a chroot into my old system, re-installed GRUB and reset all the configs, removed all the modprobe configs, and I still couldn't boot.
I ended up reinstalling Ubuntu, and this time I decided to downgrade from Ubuntu 24 to 22, just in case that might fix Lutris or fix something else (it seems a lot of software is just not released for 24 yet anyways, which is frustrating.)
So after my negative experience with playing with GRUB and modprobe, I started looking into dynamic unbinding.
It seems like there's a lot of options, there's virsh the tool installed by QEMU. driverctl and then manual unbind sockets managed by the filesystem device paths. I decided to try driverctl first on recommendation of forum posts.
So first thing I do, being naive, is to just run
sudo driverctl set-override $GPU_PCI_ID vfio-pci
This will throw 'non zero device usage counts' in sudo dmesg logs, and hang indefinitely. It also hangs in a hilarious way, where you can't even kill the process! kill -9 and pkill -f DO NOT work amazingly. Even funnier, when you try to reboot to kill the process, it causes the system to hang and forces a manual power cycle!
Okay so driverctl is out, next up virshsudo virsh nodedev-detach pci_0000_01_00_0
Each of these programs has their own way of referencing the PCI ids, so you'll just have to adapt it to their syntax. This still hit the same error, and I started looking into that and realizing I needed to kill all the processes relying on the GPU. I tried restricting my docker images with CUDA support to a specific device id:
deploy:
  resources:
    reservations:
      devices:
          - driver: nvidia
              device_ids: [ '1' ]
              #count: 1 # number of GPUs
              capabilities: [ gpu ]
But hilariously, docker ignores the device ids and just does whatever it wants. nvidia-smi cli command confirms this. So anyways, I shut down all my docker images that relied on gpus, at least temporarily.
That works great, nvidia-smi confirms no processes are using the GPU. BUT! It still doesn't work. sudo lsof -n /dev/nvidia0 shows there are processes related to gdm3 and Xorg still using it. So (over an ssh console from my laptop,) I shut down gdm3 sudo systemctl stop gdm3 and finally between lsof and nvidia-smi it shows there's nothing using the GPU. The virsh dynamic unbind command succeeds! Or at least that's what I thought would happen.
Nope, nvidia-drm REFUSES to give up the GPU even with no processes, it hangs indefinitely, but at least with virsh you can still kill the process unlike driverctl. The solution is you need to dynamically unload with sudo modprobe -r nvidia_drm BEFORE you attempt the virsh detach. Only then AFTER it's bound to VFIO and you've verified with lspci -nnk | grep -i vga -A3 can you then reload nvidia-drm and gdm3 with
sudo modprobe nvidia_drm
sudo systemctl start gdm3
Then you restart the docker containers, and they'll take the nvidia-drm GPU, and the other is free to use in VirtManager.
I followed the rest of the guide regarding VirtManager, and hit a lot of weird obstacles. First, you NEED to supply a manual CPU topology, it doesn't inherit properly the host system. I have 2 vCPUs per core and 64 cores total, so I tried to give it 32 vCPUs (16 total) but it starts up with only 2 vCPUs. I changed the manual topology to 1 socket, 16 CPUs, 2 threads, and that gave 32 CPUs, but in windows they just show as 32 CPUs with no knowledge of virtualization. Fine, whatever, it works at least.
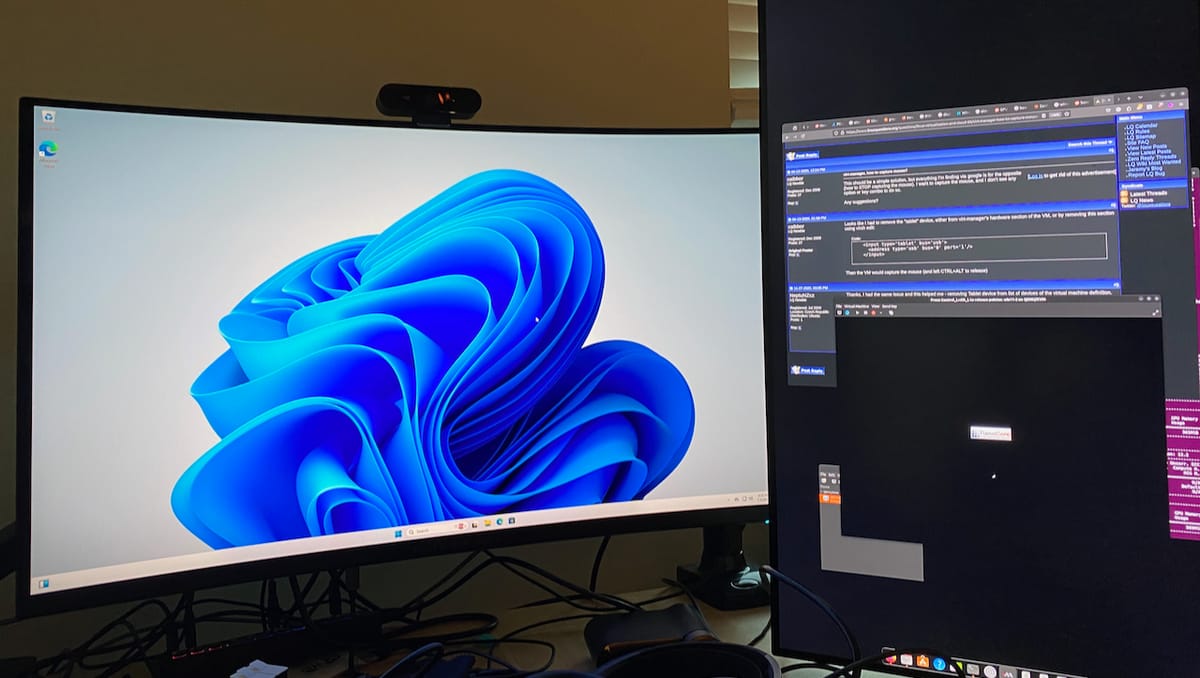
Second up is the driver installation. First thing I did (while using Display spice server as recommended,) was setup the NVIDIA drivers. The windows install didn't work on the monitor at all pre driver install. The BIOS posts to the GPU and the VM console simultaneously, but the windows installer doesn't work with the GPU -> monitor connection, only the VM console. Had to go through the windows installer and also use shift-F10 + ipconfig /release from https://www.tomshardware.com/how-to/install-windows-11-without-microsoft-account to get the install finished without making a Windows account.
After a windows install and a reboot, success! The GPU display shows up and I can duplicate the output to both the monitor and VM spice display console! I was ready to celebrate. So first thing after this I installed the NVIDIA drivers. Disaster. It turns my screen black during the install and I thought hey this is okay, I'll just let it finish, the VM console is still working. After reboot, the GPU monitor is no longer usable, the spice console is EXTREMELY buggy, and I can't even login / it keeps flickering black. Something went wrong.
Okay so I deleted that VM and tried again. After lots of googling, I decided to try running windows update FIRST, before NVIDIA driver installation. I used NVIDIA version 537 that is much older than the current driver release (DCH release still though.) And I disabled GeForce Experience. After all that, it finally worked flawlessly!
So I immediately go to run Diablo 4 to test it out, bam, game lags on startup and then immediately crashes. Fantastic, same experience as lutris. I wondered if it was the spice VM display server somehow, so within Windows I disabled the monitor output to display 1 (the spice server,) and set it to only output display to the GPU passthrough monitor. I also used nvidia control to set a max framerate of 60 FPS. It worked! Game started and played perfectly, I couldn't believe it.
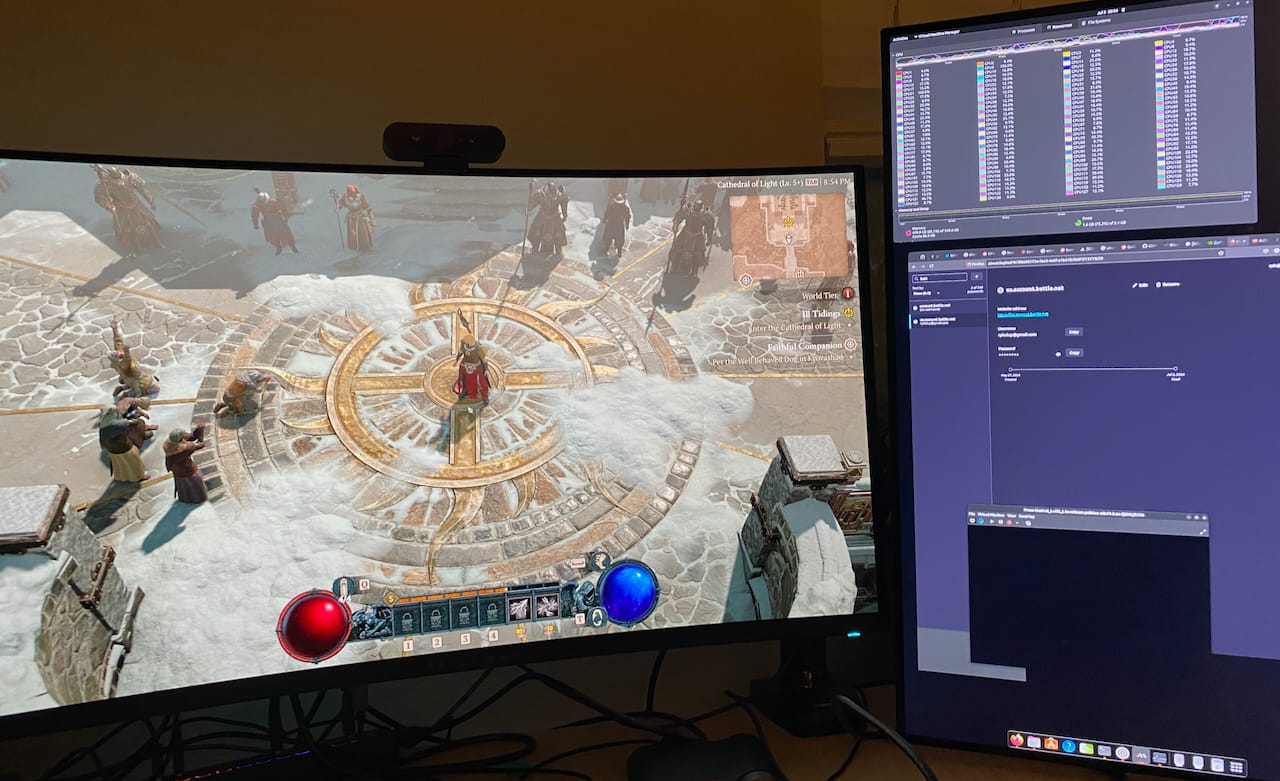
Also, this blog is hosted on that same computer routed through tailscale to a VPS running HAProxy forwarding to Traefik on the computer to a ghost docker image. So it can serve all that in the background while playing this game.